

Key Takeaways
Why the Obvious Fixes Aren't Always the Whole Story
Most homeowners know to check their windows and exterior doors when drafts appear. But building science research consistently points to a less glamorous culprit: the dozens of small gaps, penetrations, and unsealed transitions that riddle the typical American home. These spots often go unaddressed for decades, quietly allowing conditioned air to escape and unconditioned air to infiltrate - year-round, not just in winter.
The Department of Energy estimates that air leakage accounts for a significant portion of heating and cooling loss in homes, yet the sources are rarely visible from inside a finished room. Understanding where these leaks actually occur is the first step toward addressing them. For context on how insulation ratings interact with sealing, see our guide on what ENERGY STAR and R-values mean for home upgrades.
Recessed Light Fixtures (Can Lights)
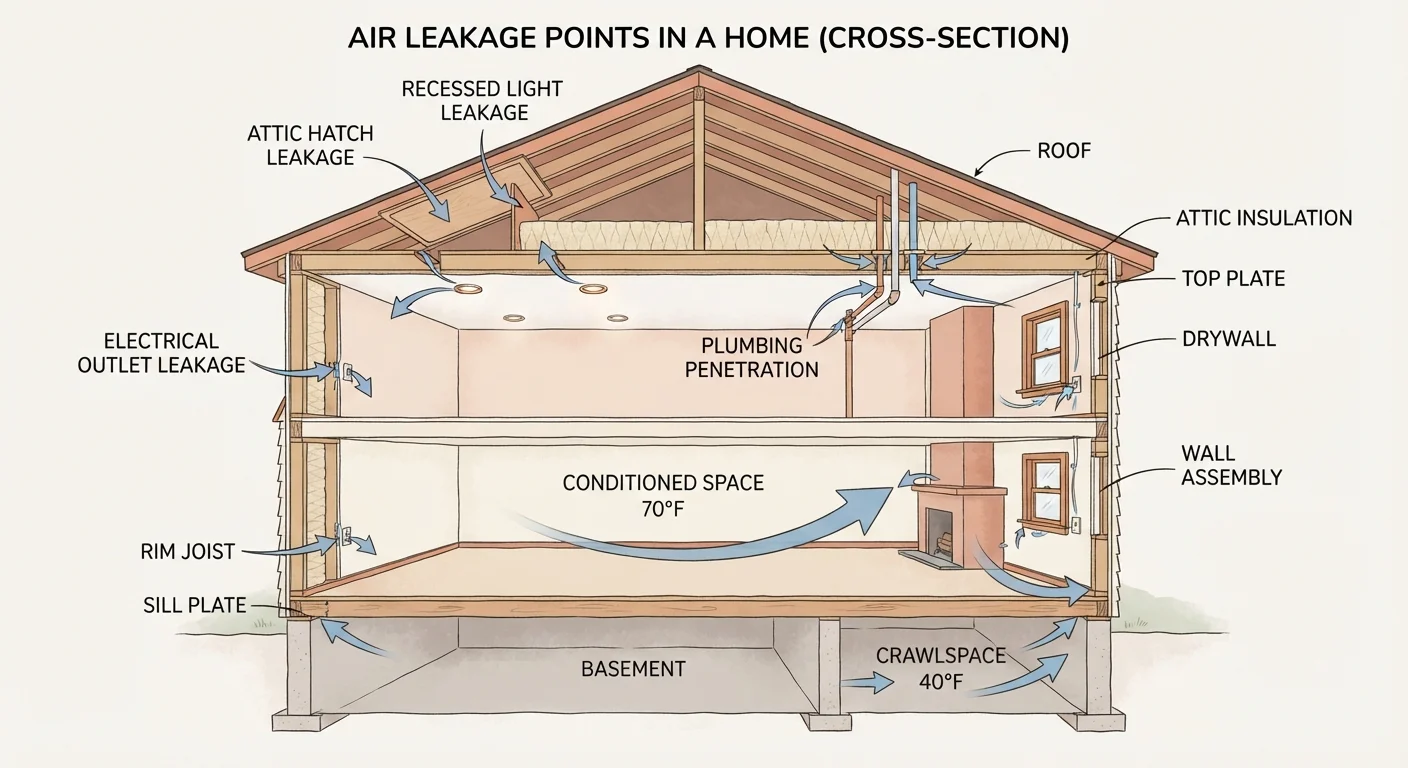
Recessed lights installed in an insulated ceiling are one of the most significant air leakage sources in older homes. Traditional can lights are essentially open chimneys - warm air from living spaces rises directly into the attic through the fixture housing. Even in newer construction, gaps around trim rings allow steady air exchange.
The fix depends on the fixture type. Older non-IC-rated (insulation contact) cans should be replaced with airtight, IC-rated models or capped from above with a sealed box before adding insulation. Newer LED fixtures that are airtight-labeled are significantly better performers. Do not pack insulation directly against old non-IC cans - this is a fire hazard. A licensed electrician should handle any fixture replacement.
Traditional recessed lights can function like open chimneys, driving warm air straight into the attic.
The Attic Hatch or Pull-Down Stair
The attic access point is frequently the single worst-performing thermal boundary in a home. A standard plywood hatch has almost no insulation value, and the rough opening around a pull-down stair is rarely air-sealed during installation. Because the attic is typically much colder in winter and much hotter in summer than the living space below, this gap has an outsized effect on comfort and energy use.
Weatherstripping the perimeter of the hatch door is an easy first step. Adding a rigid foam cover or a pre-made insulated box (often called an attic tent or stair cover) on the attic side can substantially improve performance. Measure carefully so the cover doesn't interfere with the stair mechanism. See signs that attic insulation is underperforming for the broader attic picture.
A standard plywood attic hatch offers almost no insulation value and is rarely air-sealed at installation.
Plumbing Stack and Pipe Penetrations
Wherever pipes pass through the top plate of interior walls into the attic - or through floors into a crawl space or basement - there are typically large, unsealed gaps. Plumbers cut holes generously for clearance, and insulation installers rarely backtrack to fill them. These openings can be surprisingly large, especially around drain stacks and water supply bundles.
Fire-rated caulk or appropriately rated expanding foam (check manufacturer instructions for compatibility with pipe material and location) can seal most of these gaps from the attic side. For larger openings around drain stacks, sheet metal and fire-rated caulk may be required by local building codes. Always verify local code requirements before sealing around combustion appliance flues - these have strict clearance rules.
Plumbers cut generously - unsealed pipe penetrations into the attic are often far larger than the pipe itself.
Electrical Outlets and Switch Plates on Exterior Walls
Electrical boxes on exterior walls are direct conduits for outside air if the wall cavity isn't properly sealed behind the box. This is especially common in older homes built before air barrier standards were part of the building code. On a cold day, you can often feel cold air radiating from these outlets.
Pre-cut foam gaskets designed for standard outlet and switch plates are inexpensive and straightforward to install - shut off the circuit breaker first, remove the cover plate, press the gasket in place, and replace the cover. This won't eliminate deep wall cavity infiltration, but it addresses the most accessible part of the leak. For more involved wall air sealing, consult an insulation contractor.
Foam gaskets behind outlet and switch covers are one of the simplest, lowest-cost air sealing measures available.
Exhaust Fan and Dryer Vent Penetrations
Bathroom exhaust fans and dryer vents both require wall or roof penetrations that are often improperly sealed at installation. Beyond the gap around the duct itself, the damper flap on the exterior cap - meant to prevent backdrafting - frequently sticks open over time due to lint accumulation or mechanical wear.
Inspect exterior vent caps seasonally. Clean lint from dryer duct caps at least annually; a clogged or stuck-open cap is both an energy drain and a fire risk. Interior gaps where the duct passes through the ceiling or wall can be sealed with appropriate caulk or mastic sealant. Never use standard expanding foam against dryer ducts - it can be a fire hazard in that application.
A stuck-open dryer vent cap is both an energy drain and a potential fire risk - inspect them seasonally.
Sill Plates and Band Joists in Basements and Crawl Spaces
The band joist - the perimeter framing member that runs along the top of the foundation wall - is one of the most consistently under-insulated and unsealed areas in American homes. Air moves freely through cracks between the sill plate and the foundation, and between the sill and the band joist itself. In homes with vented crawl spaces, this area is exposed to outdoor conditions year-round.
Cut-and-cobble rigid foam insulation, adhered with foam sealant, is a common and effective approach for band joists in accessible basements. The foam should be sealed at all edges to create an air barrier, not just an insulation layer. Crawl space encapsulation - sealing and conditioning the crawl space entirely - is a more comprehensive solution but typically requires professional installation and may involve local permits.
The band joist is one of the most consistently under-insulated areas in American homes, exposed to outdoor air year-round.
Knowing When to DIY and When to Call a Pro
Several items on this list - caulking around electrical boxes, adding weatherstripping to an attic hatch, or sealing around a dryer vent - are manageable weekend projects for a careful homeowner. Others, particularly anything involving gas lines, attic structural elements, or spray foam near recessed fixtures, carry real risk if handled improperly. When in doubt, an energy auditor or insulation contractor can both locate and seal problem areas safely.
Consider a Professional Energy Audit First
A certified home energy auditor uses a blower door test to depressurize your home and locate air leakage with precision - often finding sources that aren't obvious during a visual inspection. Many utility companies offer subsidized audits or rebate programs for subsequent improvements. Knowing your specific leakage points before buying materials can prevent wasted effort and allow you to prioritize the highest-impact fixes.
Unaddressed air sealing issues also have a way of contributing to irregular, hard-to-attribute spikes in utility bills - the kind discussed in our piece on irregular expenses that quietly wreck household budgets. Treating energy efficiency as an ongoing maintenance category, not a one-time project, tends to produce more durable results.